|
|
|
| Back to Home Page | Back to Crafts Index | ||||||||||||||||||||||||||||||
| Papier Mache (sorry, my keyboard doesn't do accents!!) | ||||||||||||||||||||||||||||||
| Papier mache is a very useful modelling material. There are several ways of making it, depending on the use it is to be put to: 1) tear up old newspapers into small (2" or so) pieces and soak in warm water until completely soggy; add wallpaper paste and stir until thick. Use for 3-dimensional modelling - large or thick areas can be modelled over a base or former of card, wire, crumpled up paper etc. and built up with layers of the papier mache, leaving time for each layer to dry. 2) modelling over a mould or former - cover the mould with cling-film and smooth out ALL wrinkles; tear paper into strips or squares, wet and cover the whole surface of the mould with one layer of wet paper, then cover with wallpaper paste, stick on a second layer of paper, paste, and continue in this way until the desired thickness is built up. (It is a good idea to use different colours for alternate layers so you can be sure that the mould is completely covered each time ensuring an even thickness.) 3)egg-boxes or trays (NOT the polystyrene ones!) make good papier mache - break up, soak and then use as in method 1. Whichever method you use, leave the papier mache on its mould (if appropriate) to dry thoroughly. Remove cling film if any and leave a while longer to ensure inside is dry. Paint with water colours, enamels or acrylic paints and varnish. Some Ideas for Modelling with Papier Mache : |
||||||||||||||||||||||||||||||
 |
||||||||||||||||||||||||||||||
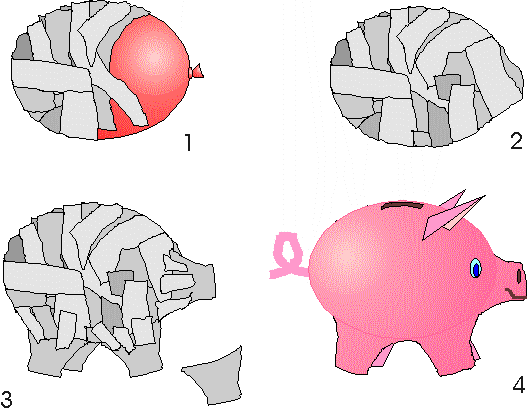
| Piggy Bank Use method 2. Inflate a balloon and tie the neck firmly with a piece of thin string etc., not by knotting the neck. Cover the inflated balloon with strips of paper - you will need a good covering, about 10-12 layers, for strength. Attach "feet" and "snout" cut from tray of an egg box with strips of pasted paper halfway through the covering process. Stick on triangular "ears" cut from card and leave to dry thoroughly. When dry, mark the position of the money slot on the pig's back. Cut with a sharp knife - the balloon should burst at this point and be easily removed through the slot; if it hasn't burst, pop it with the knife or a pin. Decorate to taste. |
||||||||||||||||||||||||||||||
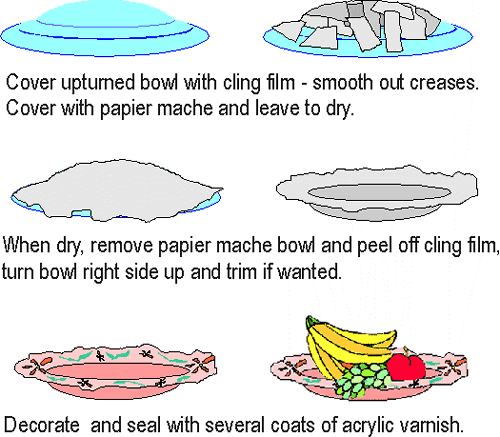
| Fruit Bowl Use method 2. Cover the outside of a shallow bowl with cling-film and make sure the surface is as smooth as possible. Turn the bowl bottom-up on a work surface. Cover the bowl with strips of paper, alternating the direction of the strips with each layer. Leave to dry thoroughly. Remove from the mould (it should come away easily) and remove the cling film; leave for the inside to dry. You can create a textured surface by sticking on decorations such as (dry) pasta shapes, etc., or card cut-outs before painting with enamels, acrylic paints etc., and finish with two coats of varnish (acrylic varnish dries pretty quickly and gives a good finish.) The same method can be used to make plant-pot covers using a plastic plant-pot for a former, or a vase for dried flowers using a drinking glass or tumbler (NB. papier mache is NOT water-tight, even when varnished!) |
||||||||||||||||||||||||||||||
 |
||||||||||||||||||||||||||||||
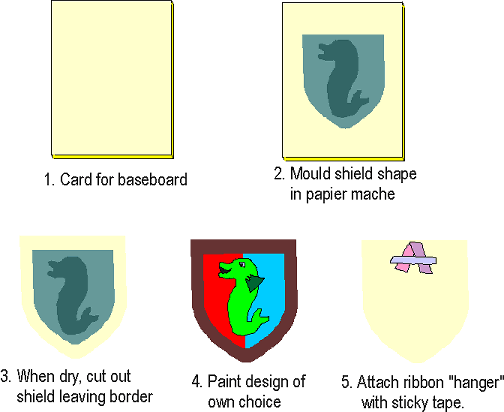
| Coat-of-Arms (Heraldic Shield) Use method 1 or 3 : Cut a square of stiff card, or, even better, corrugated plastic board, about an inch bigger all round than the finished shield will be. Draw the outline of a shield on the board; model the shield to desired thickness (about half an inch is about right) in papier-mache. If desired, indicate differents areas of the shield roughly - by relief, texture etc., but this is not essential. Weight down the corners of the board while the papier mache dries, to prevent it warping. When completely dry and hard, paint in desired design - this is something which can be worked out on paper while the papier mache is drying! Cut the backing board to make a mount for the shield, paint if necessary and varnish the whole thing when the paint is dry. Attach a hanging loop to the back. |
||||||||||||||||||||||||||||||
 |
||||||||||||||||||||||||||||||
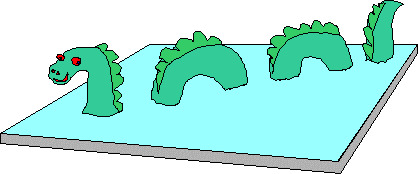
| "Loch Ness Monster" (just for fun!!) You will need a mounting board approximately 8" square - the precise size doesn't really matter. Use papier mache made by methods 1 or 3 and mould "humps" onto the base board and a "head" and "tail" (see diagram.) Make sure the spacing and alignment gives the impression that the animal's "body" continues below the "water!" When dry, paint Nessie any colour you like, and the board to resmble water. Varnish and enjoy! |
||||||||||||||||||||||||||||||
 |
||||||||||||||||||||||||||||||
| ("Mod-Roc" - plaster of Paris bandage - makes a good alternative to papier mache if available. Nessie is particularly easy to make with Mod-roc, and sets much faster when made this way.) | ||||||||||||||||||||||||||||||